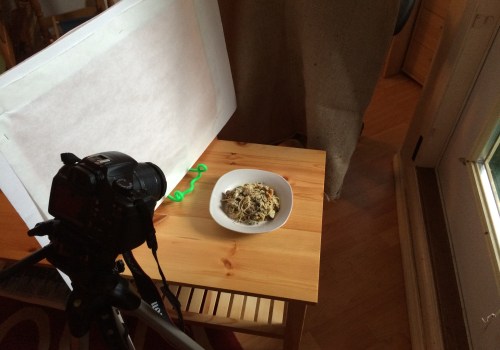
Food photography is an art in itself, and one of the most important elements of a successful food photography shoot is the use of reflectors and diffusers. Reflectors and diffusers can be used to control the amount of light entering the frame, create a more even light spread, and reduce harsh shadows. In this article, we'll look at how to use reflectors and diffusers in food photography, and why they are essential tools for achieving the perfect shot. Reflectors and diffusers come in many shapes and sizes, but essentially they all do the same thing: they bounce or diffuse light in a certain direction. By adding reflectors or diffusers to the scene, you can manipulate how the light falls on your subject.
Diffusers are great for creating soft light, while reflectors can be used to add highlights or fill in shadows. In this article, we'll explore how to use reflectors and diffusers effectively in food photography. We'll look at what types of reflectors and diffusers are available, how to choose the right one for your needs, and how to position them for maximum effect. So if you're looking to add professional-quality lighting to your food photography, read on to learn more about working with reflectors and diffusers!
Using Reflectors and Diffusers With Natural Light
When shooting with natural light, reflectors and diffusers can help you take advantage of existing light sources like windows and doorways to create beautiful food photos. Reflectors and diffusers can be used to bounce light onto your subject, soften shadows, and create a more even light distribution. When shooting with natural light, it’s important to be aware of the direction of the light.The angle of the sun or a window will determine the way your subject is lit, so be sure to take this into account when setting up your reflector or diffuser. Generally speaking, you should have the reflector or diffuser facing your subject and angled toward the light source. In addition to bouncing or diffusing light onto your subject, you can also use reflectors and diffusers to shape the light. For example, if you’re using a single window for your light source, you can use a reflector to bounce the light back onto your subject from one direction. Or, if you want to soften the shadows, you can use a diffuser to disperse the light more evenly. It’s also important to consider the size of the reflector or diffuser when shooting with natural light.
If you’re using a window as your light source, a large reflector or diffuser will be more effective than a small one. The larger size will help spread the light more evenly across your subject. Finally, be sure to experiment with different angles when using reflectors and diffusers with natural light. Moving the reflector or diffuser slightly can have a big impact on the way your food photos turn out, so don’t be afraid to get creative and try different setups.
Using Reflectors and Diffusers With Artificial Light
Using reflectors and diffusers with artificial light sources, such as studio lights or flashes, can help you achieve amazing food photography shots. Balancing artificial light with natural light is essential for creating a balanced image.To get the most out of your reflectors and diffusers when using artificial light, it's important to consider the direction of the light, the intensity of the light, and the type of reflector or diffuser you're using. When using artificial light sources, it's important to consider the direction of the light. Reflectors and diffusers help you direct the light in the right way so that it doesn't create harsh shadows or overly bright highlights. To get the most out of your reflectors and diffusers, you should use them in combination with multiple lights. This will help you create even lighting on your subject without creating harsh shadows or overly bright highlights. When using multiple lights, it's important to adjust the intensity of each light so that they are balanced.
You should also adjust the distance between each light source to create a more even distribution of light. The type of reflector or diffuser you use will depend on the type of light you are working with. For example, if you are using a flash, a white reflector would be more suitable than a silver one. In conclusion, working with reflectors and diffusers can help you create amazing food photography shots with artificial light. It's important to consider the direction of the light, the intensity of each light source, and the type of reflector or diffuser you're using.
By balancing artificial light with natural light and using multiple lights to create even lighting, you can create stunning food photos.
Types of Reflectors and Diffusers
When it comes to food photography, reflectors and diffusers are essential tools. There are several different types of reflectors and diffusers available on the market, each with their own advantages and disadvantages.Gold reflectors
are often used to add warmth to a photograph and provide a golden sheen when used in combination with natural light. They are great for creating a romantic or nostalgic effect, but can be difficult to use when shooting in direct sunlight.Silver reflectors can create a much brighter image and often provide the most detail when used for food photography. However, they tend to create a harsher light that can be too intense for some shots.
White reflectors
provide a soft, natural light that is perfect for creating bright, airy images. They also help to reduce shadows, making them ideal for close-up shots.Black reflectors can be used to darken an image or create dramatic shadows. They are best used in combination with other reflectors to create more depth in the image.
Translucent diffusers
provide an even light and help to reduce shadows and harsh highlights. They are great for creating a soft, natural look and can be used in combination with other diffusers to create different effects.Foil reflectors are lightweight and easy to use, making them ideal for travel photography. They also provide a unique reflective quality that can be used to enhance certain elements of the image.
Umbrella diffusers
are often used to soften the light and create a more even illumination. They are especially useful for larger setups and can help to reduce harsh shadows.Each type of reflector and diffuser has its own advantages and disadvantages, so it is important to consider all the options when choosing the best tool for your food photography needs. In conclusion, reflectors and diffusers can be an invaluable tool in food photography. They offer great flexibility and allow you to capture stunning images, no matter the lighting conditions. Different types of reflectors and diffusers can help you achieve different effects and create unique images. When used properly, reflectors and diffusers can help you achieve professional results.
It is important to invest in quality products at an affordable price to get the best results. With the right knowledge and equipment, you can create amazing food images with reflectors and diffusers. So, if you want to take your food photography to the next level, consider investing in these tools.


Leave a Comment